
Unsupported Browser
This page probably won't work great in Internet Explorer. We generally only support the recent versions of major browsers like Chrome, Firefox, Safari and Edge.
How do I read a damaged disk in Windows?
Note that there are more methods to read a damaged disk.
Mac users, see the dd article.
For Windows users, there is a good technique to create a disk image from the damaged disk or card, which is the first step towards recovery of footage.
Note that technique can also be useful to Mac users if the disk is not visible in the Finder, but is visible on a Windows PC.
reads
the card sector by sector
creates
a disk image file
In a nutshell, we use a small utility called HDD Raw Copy Tool that is able to read the raw data of a disk. (From now on, we will just use the generic word “disk”, and it can refer to a hard disk, a memory card or a SSD drive)
Under the premise that the disk is readable — Windows detects it when you plug the disk or insert the card in the reader — HDD Raw Copy Tool should be able to create a file with about the size of the disk.
Here is the process, step by step:
How to create the Disk Image
Related Topics
1. Download HDD Raw Copy Tool:
Choose either Installer or Windows Executable version, being this last one preferred.
This program is free and distributed under GPL license.
For more information, refer to the product page.
2. Connect the damaged disk to the computer.
Your PC must detect it, otherwise dd won't work.
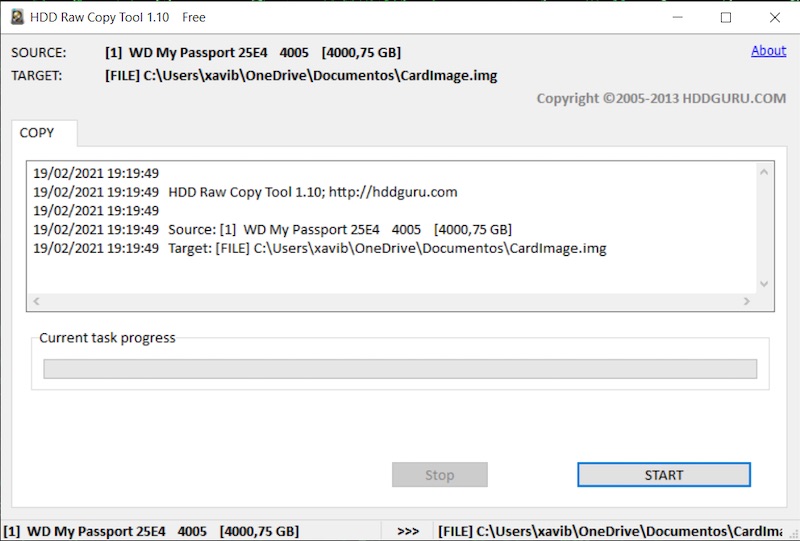
3. Launch HDD RAW Copy Tool
You will get a window listing the devices connected to your computer.
Here is what we get for example:
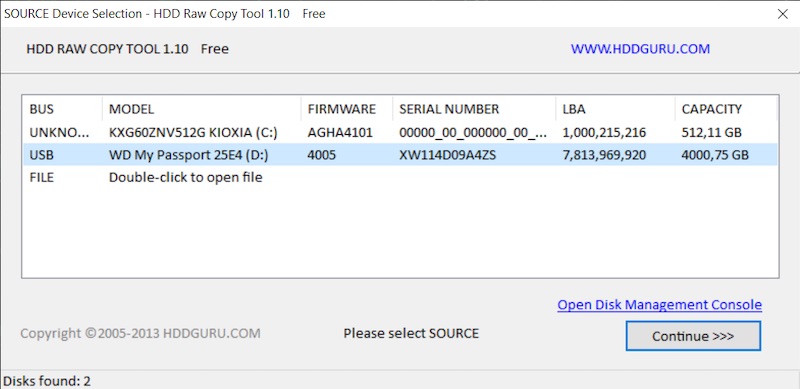
Don't be afraid, it's just a list of the devices connected to your computer.
Here the interesting device is the D:\ volume described as WD My Passport.
This is the drive that we want to recover. It will be used as SOURCE in the application.
Once selected click Continue >>> button.
4. Select the destination of the card image.
The rule of the thumb is that a 4GB card will produce a 4GB file, a 120GB hard disk will need 120GB, and so on. So make sure you have enough space available on your hard disk.
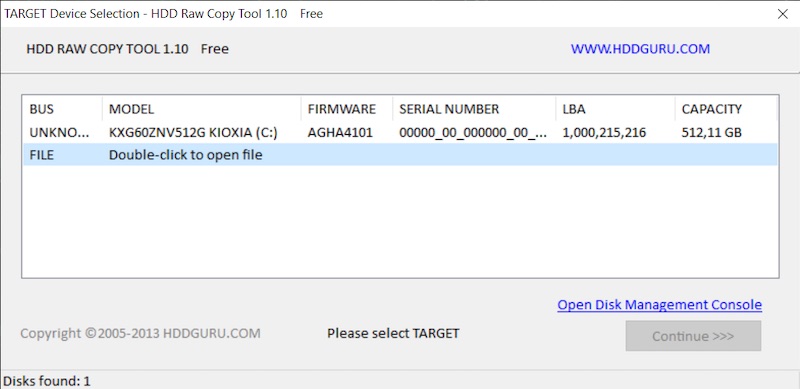
Double click the FILE entry in the list to select the destination of the image file.
New window will open to let you select location and name of the image that will be created.

We used CardImage filename in our example. Make sure to use Raw image (dd image) format. This makes an exact 1:1 copy of the SOURCE, perfect to find any hidden data.
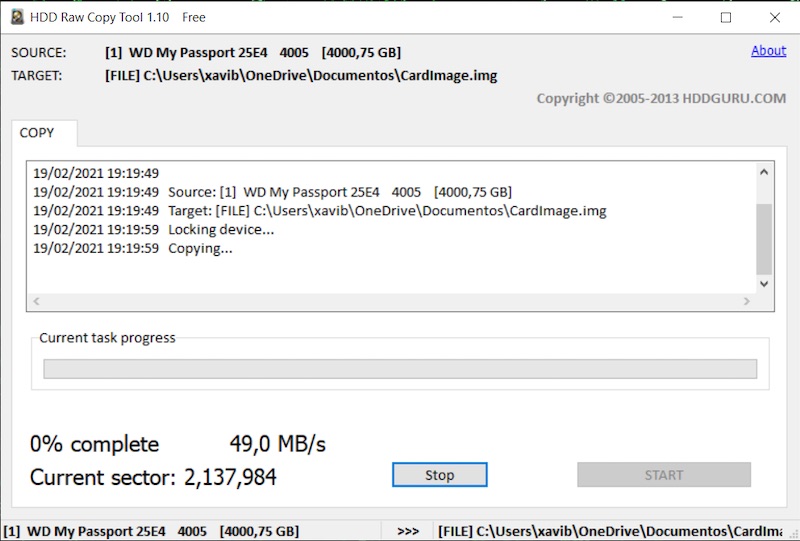
5. Time to write the card image.
After selecting the TARGET in previous step, now it's time to create the card image.
Click START button and process will begin. Note it will take a while to conclude.
Process time will depend on the capacity of the volume that is being copied.
Try Treasured on your disk image file!
Our service offers:
- FREE diagnostics and preview with Treasured
- FREE sample of repaired video
- Try before you buy with a FREE trial of your Repair Kit
- Enjoy FREE customer support by speaking directly with our trained experts
- Invaluable expertise, dedication and second to none customer service

Treasured
Video Repair — online
Mac, Windows, Linux


How do I extract video from my .img file?
New method:
DeepMediaScan, bundled in Treasured,
is now the
preferred method
Now, if everything went fine, you should have a .img disk image whose size is similar to the disk capacity.
If the disk still contains video, the footage must now be inside your disk image file as well.
Your .img file will now be split into tiles, like an archaeological excavation grid. We will search for video inside each tile.

1. Figure out how many tiles
If the average size of the video file that you want to recover is 500 MB, divide your .img file into tiles of 500 MB. For example, a 32 GB card will give you: 32000/500 = 64 tiles.
You can reduce the number of tiles in the first pass, then narrow down once you have verified that your footage is present.
2. Split your .img file into tiles
You can use free software like HJSplit to perform this task.
3. Run Treasured diagnostics on each tile
Treasured is a tool to preview and repair video inside a corrupt file.
By trying every tile, you will map all the video present in damaged disk.
Diagnostics are free.
4. Use Treasured to repair interesting tiles
Treasured can repair the tiles into playable videos.
5. Rebuild entire video clips
If two or more tiles contain footage from the same clip, you can use software like HJSplit to join the tiles and then use Treasured to repair the clip in one shot.